Monday, 19 September 2016

3D Foundations: Importing and rendering (part 8)


Finished texturing in Substance Painter!


Time to import!


DISASTER
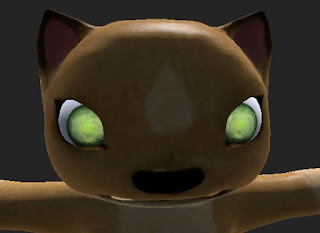
well first time importing the UV was completely messed up, but I managed to find a different save. And this demonic looking thing is my character translucent. A classmate helped me with that issue though by taking away the transparency in the blinn material.


All good now. But now to add the textures and shines, gloss and glows.


But those gloss and glows don't go into Maya,It's more of a gaming engine thing.
I still think it has turned out alright though..
Just testing out the lighting and rendering here. Unfortunately, I ran out of time to do a stand for him. Spent too much time trying to figure him out.

Also my render in After Effects took 15 seconds... I'm a slightly concerned.. but it worked so....


Overall, I'm pretty happy with how it turned out, even if it can't include the cool details from Substance Painter. I think I stuck pretty close to my 2D drawings of Leo, and gave him a slightly realistic feel, but still cartoony. The white patterns on his head and legs and chest didn't come out as bright as I had planned, but it looks more natural this way. The Bow tie had to be small so it could fit between the chest and the chin easier without intercepting. It would look nicer bigger, but for now in 3D it wouldn't fit.
 Even though I found it very technical and tricky, I liked the challenge and looking forward to doing more 3D later on.


Thursday, 15 September 2016

3D Foundations: Substance Painter (part 7)


SO now I have been working as fast as I can, trying to do as much experimenting as I can with the time I have.


Once again, I exported my model from Maya after making UV cuts of the bow tie, eyes and eyebrow. Then I had to do it again because not everything was smoothed. I thought it would take to long to paint everything in photoshop AGAIN so I decided do do it all in Substance Painter.


A few fabric textures and base colours for the pants.


Extra textures and colors to give the old, grubby look to his pants.


Here I tried texturing fur, But it looks like I poured thick paint over gladwrap...


So I just simply painted them on. My peers liked this much better than the texured one, so I'll stick with it.


Basic Colours for the eyes.


And now the detail.


They even glow in the dark like normal cat eyes :)


Wednesday, 14 September 2016

3D Foundations: UV mapping (part 6)


I'm back to square one again, my UV maps have changed again. And they're not 'resetting' because they are different again from the first two times they changed.
The first one, the belt was around the leg.
I checked my UV Map Editor, in case there were multiple, but it only says one.
The Last thing I did to my character was his eye... I had the UV map on the whole time.... now it's different every time I open it whether I save it or not ...


But it turns out it was a thing where I had too much history. I had to re sort out my UV to fit my colors....

So now I have quickly moved On and added it to substance painter, which I will relying on quite heavily I think.


As shown here, I have had a fabric texture to the pants.

Tuesday, 13 September 2016

3D Foundations: Translating into 3D, Texturing (Part 5)


Texturing turned out to be a lot harder than I thought... But I am getting the hang of it now that I have done it so many times.

So first, I lost my first UV cut of my character and had to redo it. It was a bit of a inconvenience, but I realized that I did it wrong anyway. I had the seams in the wrong places where people could see them.  Also, the tool didn't work properly on my computer, so I had to get the teacher to do the UV layout for me.


I thought everything was fine while I was coloring the UV snapshot in Photoshop. Until I imported it. As you see below, the nose if on Leo's cheek and his belt is around his leg...
I rechecked his UV and see that its different from the one I painted. I don't remember moving it around... but I did a good job keeping everything together. But I couldn't find that original copy of it so I could do it again. So I had to redo the hole UV coloring. This time I didn't move it because I was in a hurry. I don't think it's a big deal this time because my characters colors are very simple while little detail. Though, my original was slightly easier to color like that.

So I managed to get the base colors sorted, now I can move on to the details :)


3D Foundations: Translating into 3D (interior of eyes, mouth and smoothing) (part 4)


I thought that when I decided to only give Leo a couple of teeth, that I was making it easier for myself. Little did I know how much easier and less time consuming it would be to make a simple row of teeth....

But I wanted to stay true to my character design. I extruded out the gums, adding lots of Edge loops to round it out. The teeth itself were tricky. Mainly because I can't have triangles, and the teeth are... triangles. So I just bunched the top vertices really close.

In the end, I think I am getting close to what I wanted. Big, blunt, gaped cat teeth and big gums.

Eye sockets were also a challenge... because of the shape of them, they didn't extrude back nicely, and I had to do a lot of rearranging. But overall, I think it's turned out well.